|
|
|||||||
|
Daniel Hartlehnert
website |
|
Size:
2.6 Mb
Platform: Mac/PC |
|
|
| Radiosity (simulation) tutorial |
Occlusion
| 21.) At this point we will add the Occlusion Shader also from Konkeptoine to the camera's camera map tab. Set the rays to at least 100 . Set the scan distance to 30 and leave the rest at default . Make sure that the map is set to Luminance and all. Shut off all lights. Remember that if you option click on an item in the project window all the items below it will turn on or off. This makes turning on or off many lights a snap. Turn off all but the diffuse,bump and shader render flags. I have found that occlusion works with clip mapping so if you have a clipped items in the scene leaved clip on as well. Render out the scene and you will have a way to mask out the light from the bounce arrays that was not properly shaded and shadowed since our rigs cast no shadows. This will become even more obvious once you put some furniture in the room. | .jpg) |
The Final Render
22.)To render out the final image as a still I will break it down into layers as follows:
a.) Key Light spot with hard shadow only.
b.) Spill Light spot with soft shadow only.
c.) First Bounce floor array only.
d.) First Bounce wall #2 array only.
e.) Second Bounce ceiling array only.
f.) Second Bounce back wall #3 array only.
g.) Occlusion pass.
Optional layers
h.) Key light and caustics
i.) Spill Light and caustics
j.) Light beams
I find that setting network rendering to on and using renderama is a good way of setting up the multiple renders even if you only have one machine. because you can feed the renders to renderama while it is rendering. By the time you finish sending out the 7 layers one of your renders might be complete. This will also work in motion but for this tutorial I'm going to stick to a static image that will be composited in Photoshop. Once all your renders are complete it is time to composite them in Photoshop.
Photoshop
This is the final stage of the process. One can finesse the results to produce a more appealing image than the raw render can provide. In this portion of my tutorial I will examine the compositing process and how I get to a final result.
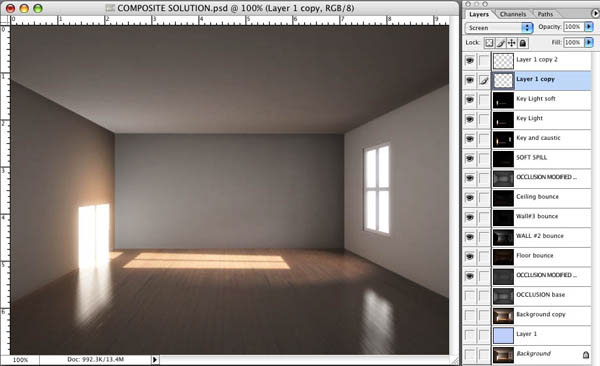
| Here are the results of a Photoshop composite using the layers and finessing a bit. This is about 5 minutes worth of work. | 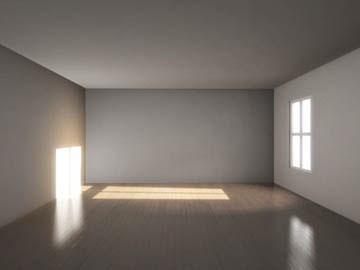 |
AND HERE IS HOW IT WAS DONE:
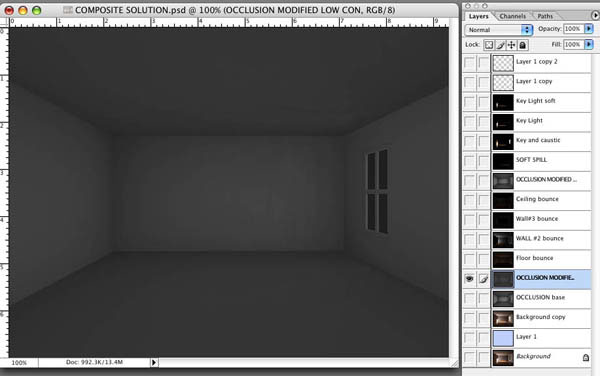
| All the steps are the same except make sure that your orientation of the map is correct since doing the ceiling can get you a bit turned around. The only real change here is that as a second bounce I will assign the intensity in Light rig to 0.05 since this is a second bounce and therefore should be a bit weaker since more light is being absorbed by the second surface. I used 20 lights for the second bounce on the ceiling since the light is spread across a large area now. Once again set highlight to off and falloff to 30. Do the same for the back wall which is Wall #3. Render out the scene. The base layer for all practical purposes for this composite is the Occlusion layer. It has been modified with the Brightness & Contrast controls to be a generally flat and dark version of the room. For this I used a setting of -65 contrast and -15 Brightness. |
 |
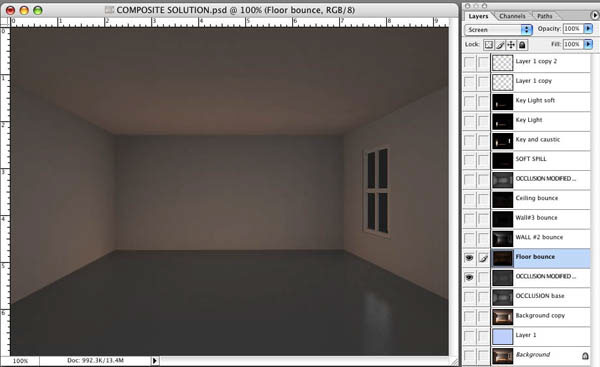
| The floor bounce was added at 100% as a screen layer on top of the dulled occlusion layer. |
 |
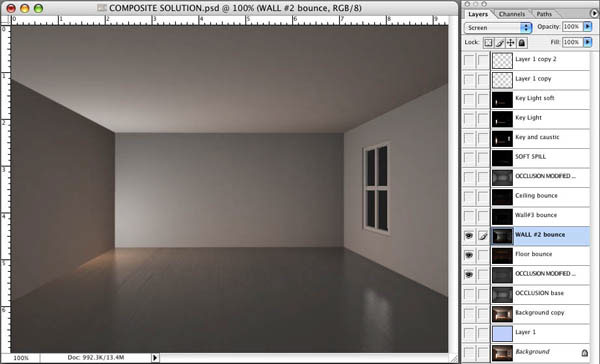
| The wall bounce was layered on top of this to give us the composite equivalent of the 1st bounce solution without the key lights. |
 |
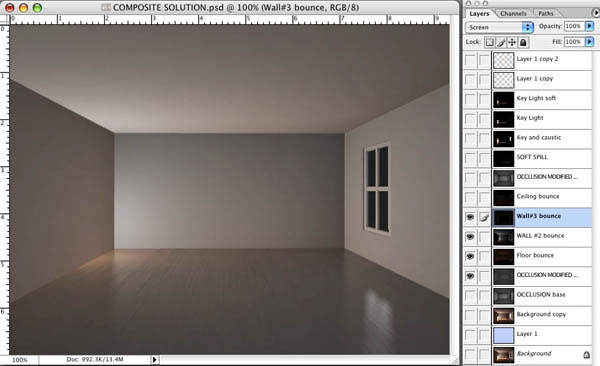
| Here I have started to add components of the second bounce solution. The soft bounce light from the back wall ,Wall #3 is added as screen mode here. |
 |
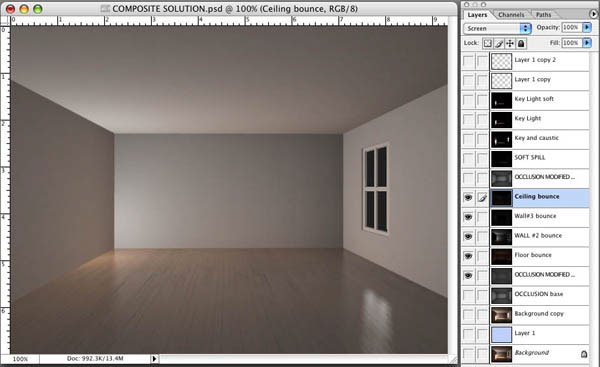
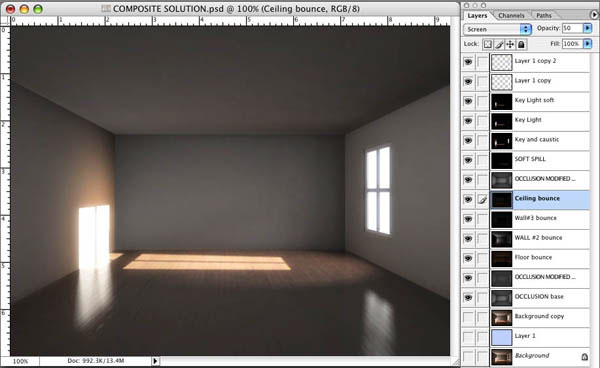
| Finally, the last of the bounce illumination is added. This is the ceiling bounce which is again used at 100% screen. What you see is the additive results of all the indirect ambient light that I have produced with the Light Rig arrays. None of these lights produced shadows so that the next step is to supplement this with ambient Occlusion. |
 |
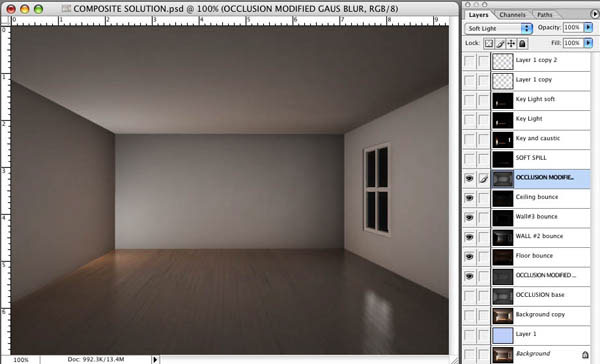
| Here is the result with the occlusion shading added to the scene. I am using soft light at 100% for this particular example. Depending on the effect that I want I occasionally employ multiply, darken or overlay mode. Each mode can produce a different and unique effect. I am going for the most basic composite here and the end results have lots of room for finessing. This is also the layer that will add critical detail if you were to add objects to the room. Without it they would float and not appear grounded. One additional note is that I added some Gaussian Blur to the occlusion layer to soften some artifacts that were present with the sample level of 100 rays that I used here for the CG. Look at the sample of the occlusion layer above to see what I am talking about. Now it is time to add the key light to the scene. The key lights produce their own shadows so they do not need a shading assist from the Occlusion layer. Also the occlusion layer would muddy the bright highlight area and make it look artificial. Specular highlights , reflections , and glows should generally be above an ambient occlusion layer as well. Reflections and specular highlights can sometimes benefit from a reflection occlusion layer but I have no need of one here. |
 |
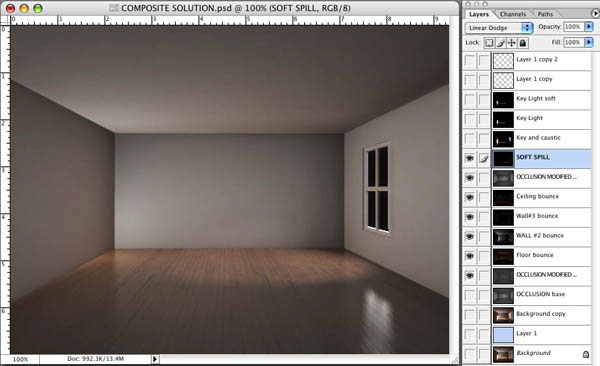
| Here the soft raytraced spill from the window is added with a linear dodge mode at 100 %. I chose linear dodge mode because I liked the effect more than the screen mode. It has a bit more contrast in the results. |
 |
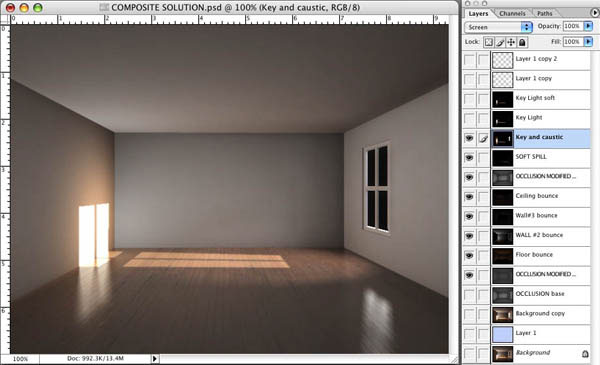
| The next layer is the key light with a caustic rendered. It enhances the bounce on the wall with the warm soft caustic. This is layered in screen mode so as not to blow out the highlights too fast. |
 |
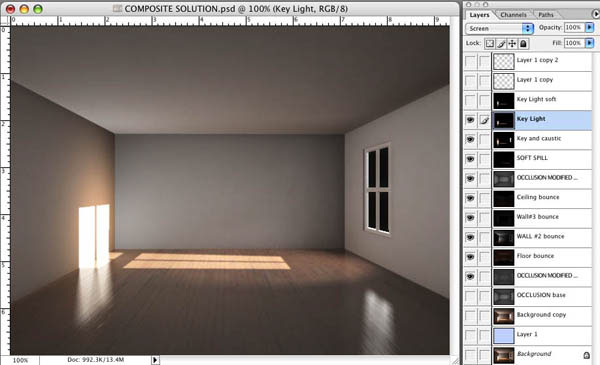
| The key light on the floor and wall alone is layered on to give the floor highlight a bit more punch. Direct sun illumination is usually blown out in photographs where the exposure has been made for the interior lighting levels. |
 |
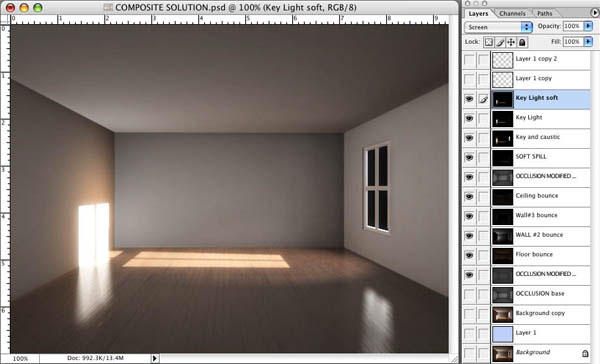
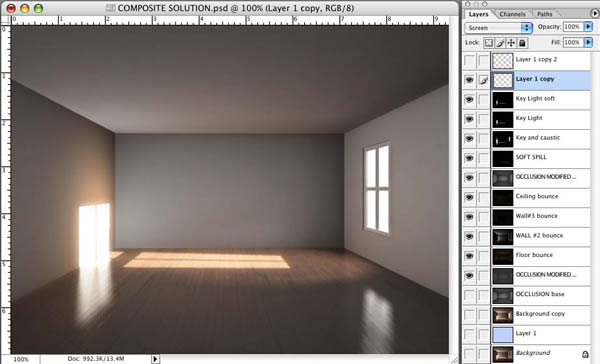
| Here I have placed another copy of the key light from the last layer. This copy has been blurred a bit with a gaussian blur. This adds further to the punch of the suns direct illumination. It also provides a bloom effect that is usually there in photos and even our eyes. No optical system is optically perfect except maybe a CG camera . This helps to make it look more real. The final component is our window. For this I am using a cheat of sorts. |
 |
| Here I have used thew alpha channel to cut out a shape that matches the window panes. I have made it an almost white blue. and added it in screen mode. It is almost there now. |
 |
| For the final later I have added a copy of the previous layer and added a bit of gaussian blur to it. After all if the wall is blooming the primary source of the light has to as well. This gives us a good starting point if we want to tweak the results further. You could make the room dark and moody by reducing the percentage of some of the bounce lights. |
 |
| Here all I have done is reduced all the bounce layers to 50% instead of 100%. Everything else remains the same. |
 |
HINTS AND TRICKS
Finally there are a few tricks that I have that may help.
1.) The key and spill lights were used in a weight map that we also added to the Luminance channel in EIAS. If you turn on this channel for the wall and floor that receive direct illumination from the Key and Spill soft ray traced light. and turn off the key and spill lights, both have a significant render hit , you will find that your render now looks like you have those 2 lights turned on. This can be useful as long as nothing passes through the light beam.
2.) If you add objects to the scene this solution will work without further modification as long as none of your objects significantly blocks the beam from the key light. If it does you may have to produce a new Light Rig array for the new object and depending on how big the shadow is on the wall or floor a new array for that surface as well but generally the rest of the solution can remain intact unless the new rig adds significant bounce to one of the walls ceiling or floor. Small moving objects that cast small shadows may not need anything at all.
3) Objects both moving and still will benefit from this type of setup since all the light is actually there. So if you were to have a character or object pass through the beam of light it would be illuminated by the beam and by the bounce fill. Your After Effects composite could be essentially the same configuration as the one that I have here and as the character passes through the beam you could manually reduce the opacity of the bounce illumination layers and then bring it back up. For the bounce from the character you could hand rig a couple lights and link them to the character and bring up their intensity to simulate the bounce off the character. Make sure that if the character is red the lights are a matching color. Together this would make a really nice effect.
That concludes this Tutorial. If I can think of any other permutations of this method that should be added I may write a part #2. I leave you with a more complete scene which led to this tutorial. I hope that this helps someone and I'll be glad to answer questions if I have the time and if my spam filter doesn't filter you out. Please do not use the words Viagra, Rolex, Cheap, Great Rate or Penis in the the subject line and you have a better chance of not getting deleted.
Sincerely,
William Dempsey
|
||||||||
 |