|
|
|||||||
|
William Dempsey website |
|
Size:
2.6 Mb
Platform: Mac/PC |
|
|
| Radiosity (simulation) tutorial |
edited by Robert Jan Kila
Hi All,
In this tutorial I will outline my method for for faking radiosity using Konkeptoine's Light Rig plug-in for Electric Image Animation System. The reason that I came up with this method is because I found that the current version of radiosity in EIAS can be a bit finicky. I have had great results with a plain room and geometric shapes but if I used a model that I could not control the tesselation on I found the results were frequently unusable. Because my work is often a fusion of CG and photography or video I find that I need to simulate the effects of light as realistically as possible or spend lots of time hand working things to fit. The method I am outlining here is nothing new. The use of simulated bounce and fill lights in CG is common practice. All I am bringing to it is a way to automate the placement and color/intensity bias of bounced light thanks to Light Rig. (LightRig is NOT included in the projectfile. You must own a copy of LightRig in order to work with the project file, Robert)
I will make project files available for the EIM model files as well as the final EIAS file. You will need the Light Rig plug in to set up a new light array, but the ones in the project file are set and do not require the plug in to view how they function.
To make full use of this tutorial you will need EIAS 5.5, Light Rig and the Occlusion shader from Konkeptoine, Photoshop CS for stills or After Effects for motion for compositing. Also a copy of this tutorial project is a must since many of the settings will be specific to this project.
I would like to apologize in advance since I only use Macs I don't know the Windows keyboard equivalents.
First step is the model.
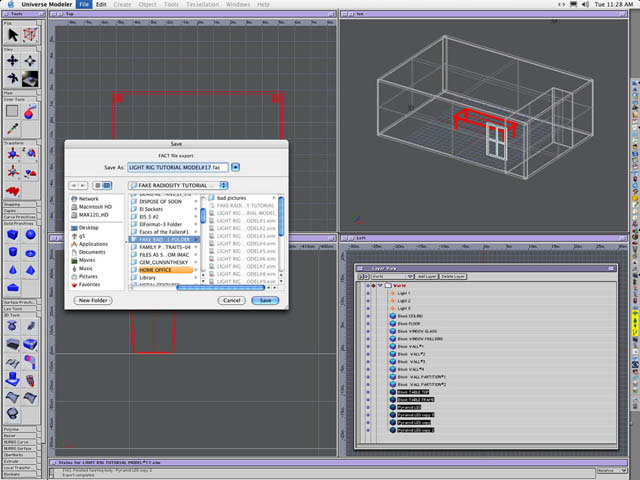
| Build a room of any type that you desire. The important things to remember is that all the walls , floors and ceilings should be separate objects that can be easily mapped with ideally a flat map for efficiency. I have not experimented with curved walls but the limits to the mapping are really any type of map that can be applied as a diffuse map and that Light Rig can use. Currently camera mapping does not work for this. For this tutorial I will initially start with a fairly simple box shaped room that has a single window. All walls are separate objects and the window is a hole cut in one of the sides of the right wall. In this case each of the walls, floor and ceiling has been built with one if EIM's solid primitives and positioned to create a box approximately 30 x 20 x10. The window is cut with a knife tool and the remaining block is copied scaled and chopped into mullions. The remaining copy is scaled to be the glass of the window. I also will be building some additional components that I will save for later. These items will be a set of partition walls and a table.. Before exporting I set the export tessellation to break the model into 1 meter segments that will be 1 GU segments in EIAS. I am loosely assigning GU's to approximately 1 foot for the room. |
 |
| Export the model as a Fact file if you are using EIM. Any modeler will do as long as the tessellation settings are approximated. |
 |
Import the model into EIAS.
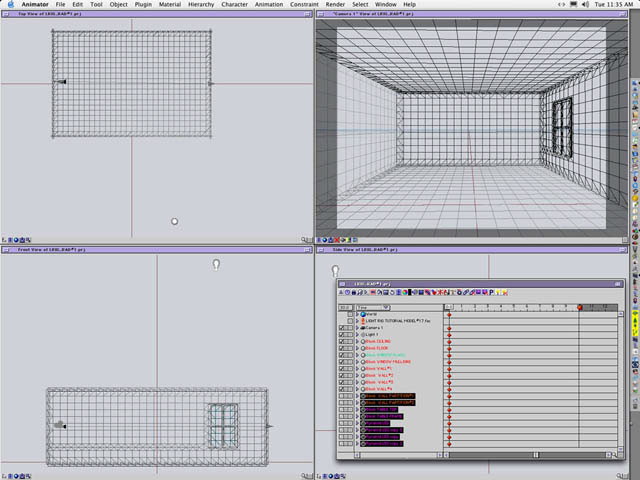
| 1.) Set the window glass to no shadow and the rest of the objects to high precision shadow in the object pallets. If you select all the models you can hit the control button after setting the radial button and use the "set selected" setting to speed things up. This will also come in handy later with Light Rig. 2.) I also like to color code my objects that helps me to differentiate types of objects as well as use selection sets if I choose. 3.) Position your camera in side the room. I have set mine to approximately 5.5 feet with the reference at the same level. I used the zoom tool to set the FOV. This is not critical to the process. |
|
| 4.) Set your key light (Sun Light) to "spot" , turn on buffer or ray traced shadows, and position the light outside the window at a location and angle that looks through your window and strikes the floor and far wall. This is aided by viewing what the light sees in the camera window . To do this go to the button on the far right of the set of buttons at the base of the camera window , the camera select button. Choose your key light and use the pan zoom and track tools to set the lights view area as close to the window as possible to maximize efficiency . |
 |
Note: Either type of shadows will work but I have found that occasionally light may appear where you don't want it near seams with the buffer shadow. If this occurs go to the raytraced shadows or set softness and gap to 0 in the buffer light shadows control .I have chosen to use a ray traced shadow for this particular setup.
| 5.) You may wish to give your sun light a color cast at this time and in this example I set the sun light to 3 intensity but you should choose what looks good in your scene when you render a test. |
 |
|
||||||||
 |