|
|
|||||||
|
Gustavo Muñoz website |
|
Size:
0 ko
Platform: Mac/PC |
|
infos: |
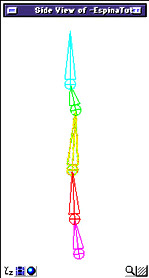
| Controling the Spine |
Let´s begin by building the geometry bones chain for the spine. We just need five bones for this, because we can use the weight maps to get a smooth bend between them.
|
 |
|
 |
||
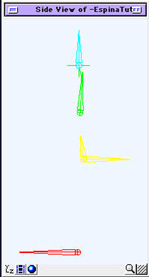
| Then we can build another sytem to drive this first one, with just the bones we´ll use for animating purposes.
It is just a duplicate of the first chain, reordered in a way which allows the control bones for the pelvis, the torso and the head to be independent between them, and at the same time all being childrens of a new horizontal bone, wich starts at the beginning of the pelvis and runs backward. This bone, called "UPPERBODY", is the child of another one, the actual root of the full controlling skeleton, usually positioned at 0,0,0. Let´s call it "EVERYTHING". |
 |
|
 |
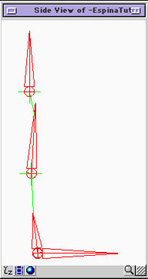
This is the basic controller´s chain we´ll use to animate the spine of our character, very simple but enought to move him in a convincing way. Some smart Weight Maps, maybe some good old "volume bones", and we can begin with keyframing and function curves... | |
We will now "glue" the geometry bones with their controlers in a usefull way with the IK system and the Constraints in EIU, just as we did before with the finger.
Our first stept will be adding two IK solvers, each controlling just one bone, the first one (IK torso) driving the lumbar bone, and the second driving the neck bone. We will call this second "HEADTRANS".
"HEADTRANS" must be a child of the Torso control bone. The "IK torso" solver will be a child of "UPPERBODY", and then we can hide it because it will not be directly animated. And now let´s setup the Constraints:
We first apply a position constraint to the pelvis geometry bone, with it´s controler as a target. Then we can apply it a rotation constraint with the same target. Now the pelvis geometry bone moves exactly the same way as it´s controler does.
| The lumbar geometry bone is driven by it´s own IK solver, which traslation is also controlling the movement of the torso geometry bone. So, this last bone will just need a rotation constraint with the "TORSO" controller as target. We now have the "TORSO" controlling all the animation of this full volume. |  |
| Our last constraint will be a positional one applyed to "HEADTURN", with "HEADTRANS" as the target. And that´s all, we are now ready to animate the full spine with our simple rig. It´s a very easy setup, but it´s enought to pose the whole body just as you want, and very usefull to build a quick and smart animation. Raf Anzovin designed this kind of setup with animation efectivity in his mind, and it has proved to be a nice help in the hard work of animating characters for a lot of happy users, including myself. Let´s see how does work the little engine we have build as far. |
 |
<< back | next >>
 |
|
|