
 |
|||||||
|
|
|||||||

| (US) ElectricImage |
| (US) 3DNY.com |
| (US) DV Garage |
| (US) Post Forum |
| (SP) Macuarium |
| (SP) EIU Spain |
| (JP) Studio Momo |
| (JP) Kagiba BBS |
| (US) ElectricImage |
| (US) 3DNY.com |
| (US) DV Garage |
| (US) 3D Buzz |
| (JP) Takashi Inoue |
| (SP) Eterae studio |
| (SP) Triade |
| (US) MForge Presets |
| For Universe Mac/win Kindly provided by Toby Thain at Telegraphics |
| Steamroller 1.5 |
| This time we will be testing an extraordinary plugin. And it's a particular one, since it's not simply generating a certain effect like most plugins do. In fact, Steamroller is more like a cool texture mapping utility rather than just being a traditional EI plugin. Though it's functionality might be compared to software like UVmapper or UVunwrap, this one doesn't work with UV coordidates. If it's not an UV Editor, what are the advantages then... First of all, for those who've heard rumours about UV mapping being "so practical" , I would like to demystify this subject a bit by telling you that this technique might come in handy but still demands hours of unfolding the model and adapting the textures, especially when dealing with complex models... And in case you would like to change your model at the very last moment, you might as well start from scratch. |
 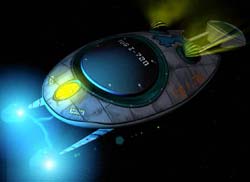 Image by Chris Weyers - chris@overthruster.com |
After this little intermezzo about textures, let's go back to our plugin.
The first thing people are going to love is that, when opening Steamroller, you will be able to stay within Universe without having to switch to a different application for texturing a model. And that's not only a big advantage but also a great timesaver, keeping you from switching back and forth.
Apart from that, it's a pleasure to see how similar the Steamroller interface looks compared to Animator's own texture window. To say the least, you feel instantly at home when opening this plugin and you're ready to start working, even without reading the documentation. The developpers really did a fine job by dividing the interface into three main sections.
On the left side, you see a list of all the model groups that have been parented to Steamroller.
In the center part of the interface, you find the "template settings" that specify Steamroller's mapping placement. These look all very similar to the settings in Animator, which makes it a lot easier to understand.
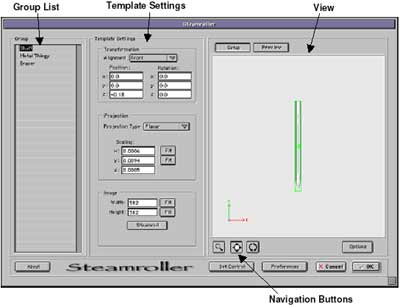 |
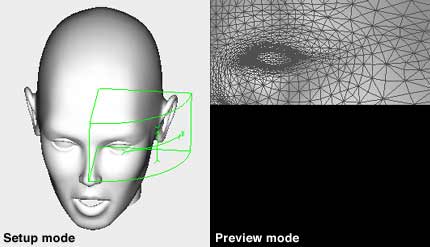
Above this preview area we have two buttons called "Setup" and "Preview". By clicking the "Setup" button you see your OpenGL model where the texture is placed and clicking on "Preview" shows you a previsualization of the unfolded map according to the settings you have applied. And we finish this interface tour with a range of buttons at the bottom right side, where we find familiar options like "Cancel", "OK", "Set Control" and "Preferences".
Okay that's it for the interface, let's see how we can use this plugin
Like I was saying before, in order to start you will have to attach your models as children to SteamRolller. Just like you would with almost any other plugin.
Since all models are listed at the left side (Group), you can simply select one and the mapping can begin.
It's stunning to see that this tool even allows you to place textures at the most crazy spots. And all of this with extreme precision, the plugin almost behaves like a photo camera that can take pictures of the exact spot where you want to place your texture.
Let's for instance take a look at the "planar" mode. This simple mode can sometimes be pretty annoying in Animator, since the image deforms over the surface and - in some cases - does not cover all parts of your model. Steamroller really becomes indispensable at this point, because it shows you an exact image of where your texture will show up.
All you need to do is tweak your settings in SR, just like you would do in Animator almost, but much better because now you can position textures even at places you normally wouldn't even dare. Another big pro is that you can really economize on the size of your textures since they can be positioned at only the necessary parts of your model, all of this in an extremely accurate way.
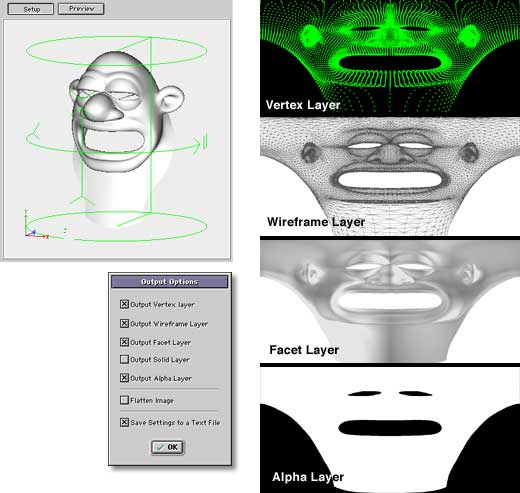
One of the big advantages of the plugin is the ability to really exploit projection types like "cylindrical" and "spherical". Until now, these types would give only adequate results by experimenting a lot and you had to feel lucky... But with Steamroller your luck makes place for precision. Below you can see an example of cylindrical mapping in SR, also showing the window where you can specify your output options and a set of layers, ready to open in Photoshop to paint your textures in.
 |
For this test we've decided to place a texture at a rather curvy spot of a human face. We only use one quarter of a cylinder (90 degrees) only covering a part of the model's height.
Normally I would never even dare to do a thing like this, under these conditions as complex as it looks. But this time it's a real treat !
 |
Next step is to specify the image size that will serve as your template and you click on the magic button called "Steamroll" in order to export your model as a Photoshop image.
A window will open, asking you to specify your output options. You can choose to have multiple layers, showing your model in vertex mode, wireframe, shaded view and an option to generate a flattened .psd image.
With these kind of complex mapping types, the advantages of a plugin like SR as opposed to other free apps become clear right away. Remember that SR interprets the same mapping parameters as Animator which gives almost infinite experimenting opportunities, without limits and polygon perfect.
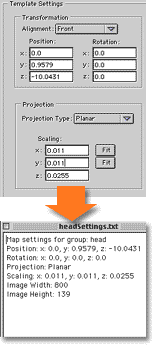 |
Export the template The plugin offers an option to export the mapping parameters as a text file, ready to be typed into Animator. This comes in very handy ! You would almost dream of a button in Animator that would be able to read this information in the texture window :-)) All that remains to be done is to click on the OK button to generate your .psd file and - if you chose to do so - generate a text file. The rest of this adventure will take place in your favorite Image Editor, Photoshop or another app. Here you can start painting your beautiful textures on top of the model layers that SR gave you. Back in Animator, just copy the parameter info from your text file in order to have a perfectly matched mapping, speaking in terms of position, scale, etc... Athletic performance! As for speed performances we do not complain. It works almost realtime on a G4/933Mhz machine, no matter what positioning or previewing we ask it to do. Same story for complexity of the models. We have successfully tried models with 50.000 and 100.000 polygons and no sign of any weaknesses here. The documentation does not specify whether image size output is limited for Steamroller, but we did a test trying to export a 5000 x 5000 pixel image from our human face model, and I can affirm you that it looks incredibly accurate. In this way you can tweak your settings almost polygon perfect and change the image size accordingly. It's mindblasting ! |
From version 1.0 to version 1.5
Those people who own already version 1.0 won't be disappointed, because this release covers multiple interesting new features. First of all, the interface shows off in a much more "Universe" like style. The plugin window is also resizable. You can even go fullscreen if you want to. Additionally, the window has also built-in memory, which means it pops up at the exact same position and size since you last accessed it. Not bad at all !
Also a new feature, SR enables you to save it's settings as a text file, which enables you to cut and paste into Animator's texture window... this is a breakthrough because the older version would write down it's parameters in the psd's info window. And sometimes you might have erased it by mistake.
Another new feature is the fact that SR now recognizes the wireframe color of your model. Briefly put, this comes in handy when painting references on the object in apps like Amorphium or the Colorphium plugin.
Unfortunately we had to see that the "cubic" option is still missing in the list of map types. The documentation describes that this particular type was hard to adapt speaking in terms of Steamroller's precision. Therefor, the developers decided not to incorporate this option in the current version.
Similar like buying a car, you just love all the extras !
On the display and preference side, this is more than we could hope for. They did a great job to have you instantly feel "at home" when opening Steamroller, since everything can be customized. Ranging from display options to export options and even the layer colors can be changed. Even the windows popup position and scale are memorized. Fantastic ! In fact you really can gain some productivity, avoiding to make the same changes over and over again.
Conclusion
Though the existing mapping tools in Animator are quite acceptable, I have to say that Steamroller really brings in some extra comfort and it enables you to do your positioning in a far more accurate and precise way. I dare even say that from now on, there won't be many texture projects that you'll be afraid to encounter, since everything becomes so easy to accomplish. Taking into account, that this tool will be one of the few plugins that you will use on a daily basis, I would say it's worth the investment.
Allright, to finalize this document, let's take a look at a small image which has been the result of the cylindrical mapping on my little fellow here...
Hopefully you will still have a good nights sleep :-)
Tested by David Della Rocca - English translation by Bert Vrusch - electro 303
 |
 |
||||||||||||||||||||
|