|
|
|||||||
| Daniel Hartlehnert |
|
Size:
0 Mb
Platform: Mac/PC |
|
|
| Ocean tutorial |
edited by Robert Jan Kila
Lets make some noise!
 |
This is an overview of how I did the stormy ocean animation some of you might have already seen on the Postforum or the Platter. It not only involved EIAS 5.5 but also a good amount of playing with AfterEffects, trying to get a look as good as possible. Most this will be about using noise in its various forms. You will see about that. While beta testing EI5.5 and trying out the many new features, among those that caught my attention was the new Runwave deformation. Before, there were only Linear deformations possible, and to get a more organic, random-like appearance, you had to layer several of those. Now we have Runwave, a typical noise style deformation which makes things like that a lot easier. A scene of a stormy ocean with heavy rain and big waves came to my mind, so here we go... |
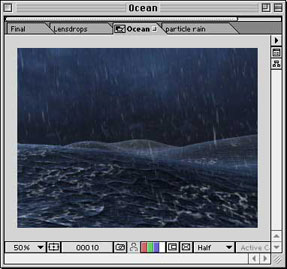
| Ocean view |
Setting up
| The first steps were straightforward, setting up a plane (Ubershape sufficiently tesselated) and applying the Runwave deformation. Originally I planned on layering two deformations, one for big waves and one for smaller ones, instead I decided to create the rest using shaders (see further down). To make the waves move, I animated the wave offset parameter. This will shift the waves through the plane. To give the waves a huge appearance, they move quite slowly. And thats already all there is concerning geometry. |
 |
| 3d view |
Next was to give the surface a rough appearance, adding small waves, just as if heavy winds were going on. Usually, the crumple shader does a very good job at that. It animates just as one would expect and the pattern it generates is also very good looking. Only problem is, in animation and especially in a distance it starts to jitter very heavily, so you have to increase the samples, which in turn gives a big render hit. Also, the edges of the waves are razor sharp not looking good when you get too close with your camera. A blur parameter for the shader would have helped here, but there is none.
Bfraktal to the rescue!
| I love this shader and use it quite often. Its your all-purpose noise shader without all the bells and whistles many other shaders have. Fast and simple, yet fullfilling most of my needs (Bfraktal is part of the aEdge shader set from TripleD, which includes several other useful shaders). Of course it takes some time to find the right parameters and often I prefer using texture maps instead of shaders for that reason. But due to the requirements here (covering a large surface without repetition, animated, not falling apart in close-up) using a texture would have been more complicated. | 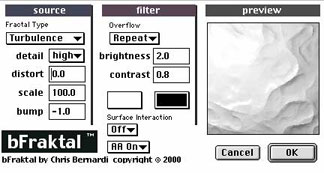 |
| B-fractal |
I ended up layering two Bfraktal shaders on top of each other, one for "big small" waves, one for smaller noise. Both are animated by moving the shader along the y-axis in the projection tab. Depending on the various scale settings, you have to be very careful not moving the shader too much. In my case, for the length of the entire animation the shaders were moved only one granger unit, while the ocean plane has a size of 1000x1000.
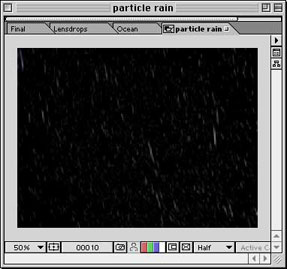 |
The last element that was done in EIAS was the rain. I used PowerParticlesPro to generate object particles. These produce a better look with motion vector blur as opposed to using points with point/line blur. To keep the poly count down, the drop objects were two squares perpendicular to each other, forming a cross (I think Blair once mentioned that method in the forums). That makes 4 triangles per drop. For the background I just rendered a hemisphere with a fully luminant sky texture. The same texture was used as reflection map for the ocean itself. And that concludes the EIAS part. For the icing on the cake, or in this case, the foam on top, Bfraktal was used again, this time in the diffuse channel. Using two instances with the top one set to multiply. This way, the black parts knock out areas of the underlying shader which generates the actual foam pattern. They are animated in the same manner as the ones used in the bump channel, only smaller increments. |
| rain pass |
On to AfterEffects
So now we have an ocean layer, one for the rain and one backdrop layer. Almost there. To make it look more realistic, I also added some fog to the scene. Originally, I wanted to use the z-depth output of EIAS and then use the Fog3D effect in AE. This effect needs the depth information stored in the .eiz file. But the camera output for .eiz files is not anti-aliased, which generates some jaggy edges I didn't want to live with. So back to the good old do-it-yourself method... Rendering your own depth pass in EI is easy. Enable fog in the world group and set it to render to color (black).
Set the radius parameters, so that the nearest visible part of your scene renders white and the one farthest away just becomes black. All groups need to have a fully luminant white material. There you go, your selfmade depth render, complete with AA. Back in AE this was then used as a tracking matte (luma inverted mode) for a duplicate of the original ocean layer. That duplicate had effects applied to make it look, well, foggy, and placed above the original. By looking at the result, this makes up for more than just fog. It also helps to make the rain look more dense. Heavy rain at a distance is really nothing more than fog.
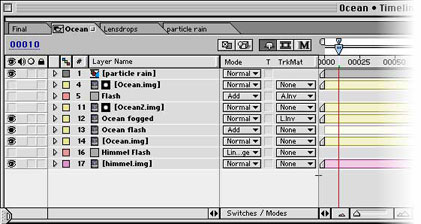
The lightning was purely done in AE with the Advanced Lightning effect, part of the Production Bundle only I guess. You may notice each time a flash strikes, the ocean and the sky look brighter. I just added a duplicate of each layer above the original with the transfer mode set to add for the ocean and linear dodge for the sky respectively. To make them only appear when a flash strikes, their opacity values were controlled by an expression which included the opacity of the AE flash layer. This way I just had to set keyframes for the flash layer and the ocean and sky lit up accordingly. I love it :)
| And finally for the lensdrops. This turned out to be the most challenging part. I tried many different methods, the particle playground effect in AE for example. Its still not where I want it, but at some point you just have to say "thats good enough". But what is it now? Oh surprise, its just a fractal noise layer. The contrast and brightness values are pretty extreme to let only the highest parts of the fractal show up. A combination of animated offset turbulence and sub offset parameters makes it look like drops crawling downward. Using "The wiggler" window I added noise to the offset turbulence movement, so the motion becomes less uniform. The wiggler creates extra keyframes for an already keyframed motion. Yeah, noise again. I mentioned that in the beginning, didnt I? But there is more to the lensdrops. For the final touch, they also distort the underlying image. | 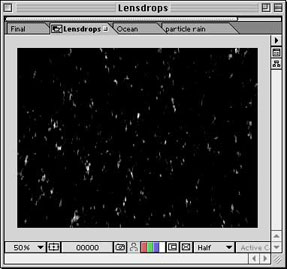 |
| lensdrops |
The Tinderbox Distorto effect in AE does just that. It needs a greyscale source layer (the lensdrops) and is applied to the rest of the composition which is nested together as a Pre-comp. Add the lensdrops themselves on top and a dramatic sound file below (this ones from the "Speed" soundtrack, did you pick it?) and ready you are.
Daniel Hartlehnert
 |