|
|
|||||||
|
Reuben Flounders website |
|
Size:
1.2 Mb
Platform: Mac/PC |
|
|
| HDRI environment tutorial |
edited by Robert Jan Kila
 |
Forword This tutorial aims to demonstrate the basic setup of a full HDR {high dynamic range} environment within EIAS. |
So first we need to create a sphere with the Ubershape plugin, set the radius to 1000 and turn off "auto name" then hit OK. The sphere will only serve as an object to map the background image to, so in the object info window, enable "cast no reflection", because we don't want the reflection of the sphere to interfere with the materials in the scene, and also turn off cast and receive shadow.
Also to allow the background image to be seen in the camera view, under the shading tab select "reverse normals" and "display texture" under the display tab.
Now open the material editor, set the specular amount to 0, luminance to 100% and select "shade".
Finally you could rename the sphere to something like ENVsphere, now we'll move on to HDR images and Gel's.
The HDR image you choose for creating the environment is important, mostly because it will be used as a background, so the higher the resolution, the better, this is less important for for reflection maps and the Gel, and its actually better to resize a large image for this usage.
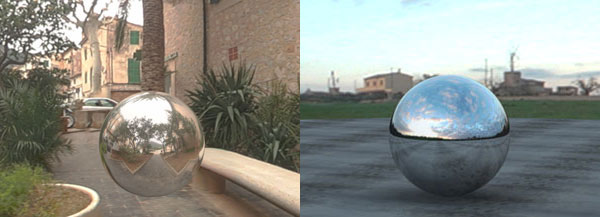 |
| Some large spherical HDR images rendered in EIAS. |
The image i've chosen for this tutorial is from the Paul Debevec site, simply because it makes the example project is a smaller download, higher quality light probes and HDR images are available elsewhere.
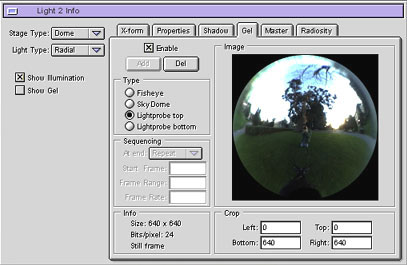
So now, from the top view add an illuminator and scale it to fit just inside the sphere, open the illuminator info window and under the Gel tab click "add" to load your HDR image, then under "type" select light probe top, the other settings allow the use of different HDR formats.
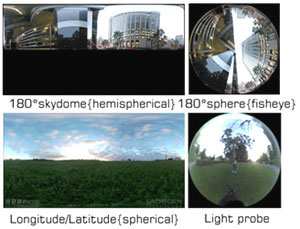 |
| Any of these formats work well in EIAS. |
Now double click the image displayed in the window and the image viewer should open, or from the file menu select "view image" and open the same image thats used for the gel, from here we can create the reflection maps and background image using some of the new editing tools.
But first, if the image appears under exposed or very dark, enabling the gamma usually corrects this, then you must save the file as a .img, and reload this as a gel, also at this point you could resize the img file in Photoshop, there is no need for high resolution files for use as a gel and your renders will be faster with smaller images.
Save out the image again for the background, click the "convert lightprobe" icon and select Longitude/Latitude, this will convert the probe to a spherical image, and then load this image into the material editors diffuse channel for the ENVsphere, also set the projection map type to spherical, now we should have a background displayed in the camera view window.
The last step is the reflection maps, we are going to control the reflectivity of the objects in the scene by the exposure of the reflection maps, not by the usual method, this is a key step in creating the HDR look
From the image viewer, drag the red slider down to under expose the image, you'll want to experiment with materials so save out a series of Longitude/Latitude images, each with a lower exposure, go down until only the brightest parts of the image remain , you can reset the exposure by selecting "center weight" from the icon next to the red slider.
 |
| Now under "world info", load these reflection maps in under the global reflection tab, but only enable one of the images, the default projection should be spherical so we can leave this and move on. | 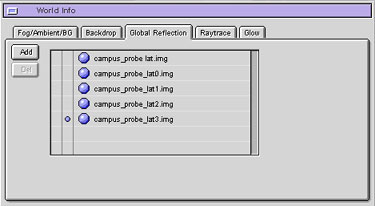 |
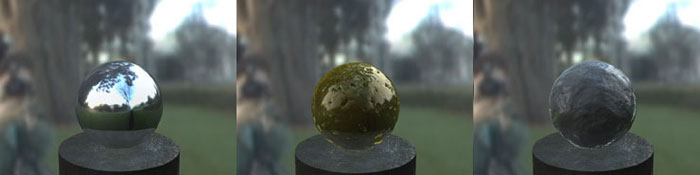
Time to add some objects into the scene, so using Ubershape simply create a sphere with the default settings, open the material editor and under the diffuse tab uncheck "use polygon color", now render a snapshot to see how it looks, not too good ?, so we want to make the sphere look more part of the scene, keeping your snapshots open for reference, increase the illuminator intensity 1.6-2 should be fine, also increasing the illuminator samples to 40 will improve the lighting quality.
And the final trick, back to the sphere material again, under the reflectivity/main options tab, set the reflectivity to full, for the reflection enabler, set the mode to normal and "use global maps", also the "hotspots" in the HDR image will be used for specular highlight, so under the specular tab set the amount to 0, now render a snapshot and you should see a nice chrome HDRI sphere.
`
Some tips
Use the reflectivity edge control, diffuse colors, and most other material attributes to achieve a different look, also try out some shaders but remember, you must always keep the reflectivity at full and the specular at 0, try differently exposed reflection maps and use the blur control under the filter tab to create smooth specular highlights.
Light probes don't always remap to a perfect spherical map, which results in some "pinching" in the background and reflection maps, the probe i've used here being an example, the only easy fix is to use a different light probe.
Finally, the illuminator only uses the colors in the hdr image{though this could change in the near future}, so you might want to add a light to any high brightness area of the background, you could also make this the main shadow casting light.
Final note
I hope this tutorial is useful to EIAS users at all levels, and although it seems like a lot of work to set this up, once you've done it a few time its really not that hard or time consuming to achieve the look, sure it would be nice to just load a light probe and hit the render button, but there is a big advantage with this technique - SPEED, massive speed gains over true image based lighting, even with high polygon counts were talking about minutes rather than hours of render time.
Special thanks to Jens C. Moeller for some tips.
Reuben Flounders
Some HDRI resources, comercial and free:
http://www.debevec.org/
http://hdrimaps.com/
http://www.sachform.de
http://www.dosch-design.com/
http://hdri.cgtechniques.com/library/
 |