|
|
|||||||
|
Richard Morley Morley Arts Edited by Robert Jan Kila. |
|
Size:
312 ko
Platform: Mac/PC |
|
|
| Rigging a simple Arachnid tutorial |
 |
 |
Forword
I was recently hired to animate a series of spiders for a music video. The shots were to contain anywhere from 1 to 10 spiders at a time crawling at a quick pace. In the past I had never animated a character with more than 4 legs, so this task seemed a little daunting at first. I set out to create a rig that was easy to handle and also offered a good amount of control over the character. By no means is this the only way or the best way to set up this rig, this is just how I decided to tackle this job. This tutorial was made for the novice or advanced user.
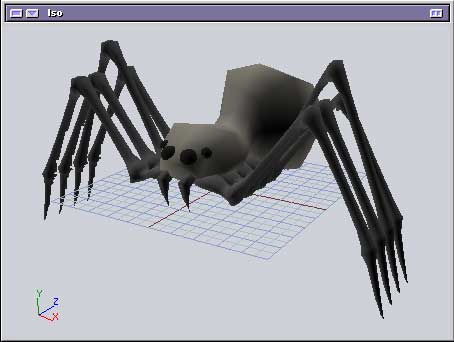
My first step was to model the spider. I've included a sample spider with this tutorial for those who don't wish to model one from scratch and would like to follow along. It is a low resolution Ubernurbs model which you should be able to manipulate in real time (it's near realtime on a G4 400Mhz with a Gig of Ram). I need a faster MAC :(
 |
||
| figure 1 |
| Step 1 Here's our spider. After modeling and importing the model, the first step is to make sure it's the correct size for your scene. This is an important step when setting up character rigs. It can be very difficult to scale an already rigged character correctly to fit a scene. I scaled the spider to 100. |
 |
Step 2
Lets start drawing some bone chains. You'll only have to draw 2 bone chains for the legs. 6 of the spiders legs are the same size. There are 2 other legs towards the rear that are larger, these 2 legs will need a different sized bone chain. Turn off all Groups except for the object you plan to add bones too. For this particular model I turned off all except "Left Leg 1". In the "Front View" window, start drawing your bone chain where the leg attaches too the spiders body, and starting a new bone at every joint. See Figure:3.
 |
||
| figure 3 |
|
TIP: |
| Step 3. You should notice that in your "side view" that the leg bones aren't lined up correctly with the leg. Fix this by dragging the blue arrow along the Z axis to center the bones chain. See Figure on the right. You should also name the parent bone of this chain for better organization. I named the parent bone "L Leg Chain 1". There's no real need to name the children bones, you won't be animating the bones themselves. It just helps to have the parent bones named. |
 |
Step 3
You should notice that in your "side view" that the leg bones aren't lined up correctly with the leg. Fix this by dragging the blue arrow along the Z axis to center the bones chain. See Figure:4. You should also name the parent bone of this chain for better organization. I named the parent bone "L Leg Chain 1". There's no real need to name the children bones, you won't be animating the bones themselves. It just helps to have the parent bones named.
 |
||
| figure 4 |
| Step 5 It's time to do the right side of the spiders legs. First turn the visibility on for the right legs. Select "L Leg Chain 1" and duplicate it once again. Rename the parent bone of the new chain to "R Leg Chain 1". We now need to rotate the leg bone to line up with the right side. Select the "R Leg Chain 1" bone and notice the -90 in the Y rotation input box. We need to change this value to 90 which will flip the leg into the correct position. |
 |
Step 6
Now looking in the "top view", drag the red arrow along the X axis to line up with "Right Leg 1". See Figure:7.
Step 7
Now duplicate the "R Leg Chain 1" and repeat "Step 4" so that all of the spiders 6 smaller leg bones are in place. See Figure:8.
|
TIP: |
 |
 |
|
| figure 8 | figure 9 |
Step 8
Now we need to draw our second bone chain for the 2 larger legs, "Left Leg 2", and "Right Leg 2". First, turn off the visibility for all legs and bones except the 2 larger legs, "Left Leg 2", and "Right Leg 2".
In the "Front View", start drawing the bone chain as before starting from where the leg would attach to the body. Then repeat Step 3, Step 5, and Step 6.
| Step 9 Now that all of our leg bones have been created, it's time to label them. Labeling makes it much easier to select specific groups quickly. Select all bones by following the earlier Tip, then while the bones are still selected, select color label, and specify a color. The bone chains in your project window should look like the figure on the right. |
 |
Step 10
It's now time to bone the Spiders body so turn the visibility of all the legs and leg bones off. Start your first bone chain (that will consist of 1 bone) where the neck and abdomen meet and finish the chain by clicking at the back of the spiders abdomen. Then start a new bone chain (that will consist of 2 bones) starting at about the same place as the last bone chain. This time we're going to go in the other direction towards the head clicking once at the base of the head to create a joint and finishing up at the tip of the head. See Figure:11.
| The bones in the "Top View" should be dead center with the Spiders body, but if they are not, align them now. Name these bones because you will be animating these particular bones later. I named mine Abdomen, Neck, and Head. |  |
|
| figure 11 |
Step 11
Our next step is too add a null which will control the body movement of our Spider. Go to Object / Add Null. We going to add our null in the "Side View". To create the null, start by clicking (keep the mouse button held down) at the top left corner of the head and drag down and across to include our neck bone and all of the head, then release the mouse button. See Figure:12. Again, in the "Top View" our null should be centered, if not, do it now. Now name the null "Mover". Now select all the body bones and color label them.
Note: You may skip Step 12 if you don't want to be able to animate the spiders teeth.
 |
||
| figure 12 |
| Step 12 First, turn the visibility of all objects except for the teeth off. We're now going to draw bones for the 2 teeth. We only need to draw 1 set of bones. Use the "Side View". Start the chain where the tooth meets the head and end at the tip of the tooth. For the teeth I added a 3 bone chain. See Figure:13. Now in the "Top View" center the chain in the middle of the "Left Tooth", and name the parent bone "Left Tooth". Now select the "Left Tooth" bone and duplicate it, align it with the "Right Tooth" and rename the parent bone "Right Tooth". See Figure:14. Select all the teeth bones and color label them. |
 |
||
|
 |
||
| figure 14 |
| Step 13 It's time to give all these children some parents. Select all leg parent bones and parent them to the "Head" bone. Then select the body parent bones, "Neck, and Abdomen" and parent them to the "Mover". Select the parent teeth bones "Left Tooth", and "Right Tooth", and link them to the "Head" bone. Your project window should look like Figure:15. |
 |
|
| figure 15 |
Step 14. Now we are going to add IK Handles which will drive the bones. To add an IK Handle, select "L Leg Chain 1", and then shift select the "Joint End" of that chain. Then go to Character / Add IK Handle, and now you have your first IK Handle. Repeat this step for all of the legs in order, this makes it easier. I have renamed my IK Handles accordingly, but this is not entirely necessary due to the fact that you will not be animating the IK Handles directly, but it will help a lot when parenting. Your "Camera View" should look like Figure:16 once you've added all your IK Handles.
| Step 15 Now we need to add nulls to drive the IK Handles. To make this easier I turned the visibility of the 2 larger legs bones off along with their IK handles. Go to Add Null, and drag from top left to bottom right to make a box. Line up the bottom of the null box with the center of the IK Handle. See Figure:17. In the "Side View" center the null with "Left Leg 1 IK". Name the null "Left Foot 1". Do this for all other IK Handles. You should end up with 8 nulls. |
 |
|
| figure 17 |
| Step 16. It's time to finish up the legs with a little more parenting. Select "Left Leg IK 1" and parent it to "Left Foot 1". Repeat this step by parenting the rest of the IK Handles to there appropriate nulls.See Figure:18. You can now select all leg bones by going to Select / By Label and lock them and turn their visibility off. Do the same for all of the leg IK Handles. We will not need to animate them or even see them from now on. We will only be focused on the foot nulls which makes it much less confusing when animating. If you want to test the rig at this point you can. Grab the "Mover" null and move it around and notice how the legs stay stuck to the floor. WARNING: Only make 1 change so that you can undo it. We need the Skeleton in it's origin so that we can attach the Spider correctly. |
 |
|
| figure 18 |
Note:
You may skip Step 17 if you skipped Step 12.
Step 17
Now we're going to add IK Handles to our Spiders teeth. Select the first bone in the "Left Tooth" chain and the "Joint End", and add an IK Handle. Do the same for "Right Tooth" and name the IK Handles accordingly. Lastly, parent the Teeth IK Handles to the "Head" bone. This way when you animate the head movement, the teeth IK Handles will not be left behind, yet you can still animate them. If you didn't bother to bone the teeth, then just parent the teeth themselves to the head bone and it will follow along with no problems. Your now done with the teeth!
Step 18
Time to Bind the Skin of our Spider for animation. Turn visibility for all Groups on. Select all the bones in "L Leg Chain 1", Go to Character / Bind Skin to selected Bones. You'll be prompted to "Select Groups to be Skinned". Select "Left Leg 1" and then hit "cancel". Repeat this step for the rest of the legs. Make sure you skin the correct Group. If you make a mistake, you can always select the Group and go to Character / Detach Skin.
Step 19
Now lets Bind the Skin of the Spiders body. Select all of the body bones (not the teeth bones)and go to Character / Bind Skin to selected Bones. When prompted to, select "Spider", and "Eyes", then hit "cancel". Then select the left teeth bones and Bind the Skin to the left tooth, and repeat for the right tooth. Now LOCK all Geometry/Groups. You'll only be animating the leg and body nulls, the "Abdomen", "Neck", And "Head" bones, and the 2 Teeth IK Handles.
Look at Figure:19 and you will see how clean and understandable it can be to do it this way. These elements are the only ones that need to be visible during animation. There are only 3 bones that have to be visible to animate. Cool huh!
 |
In Conclusion This setup will now allow you to pose the spider in just about any way you want. He is also ready to animate crawling. I've attached a sample animation of the spider crawling to this tutorial using the exact rig you just created. You don't have to worry about clicking and moving any geometry by accident, you can only select the animatable elements which makes for an easy rig (which was my ultimate goal). Hope this tutorial was as easy to follow as I intended it to be. Have fun animating! |
|
Richard Morley
Morly Arts © 2004
 |