|
|
|||||||
| Zdepth tutorial |
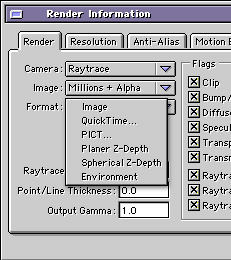 |
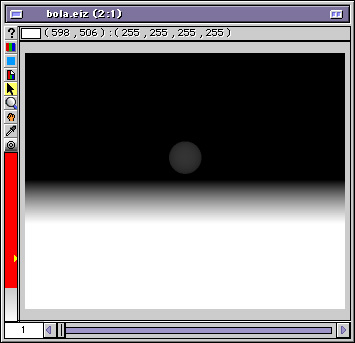
In the Render Info window we have two options for Z-Depth : Planer Z-Depth and Spherical Z-Depth. The one that we are going to use will be Planar, since Spherical (developed by ElectricImage) has in the end not been used yet by any other software developer. Rendered Z-Depth image files must be placed in the same folder as Universe images, and they are generated with the extension .eiz
|

 |
How to use the Zdepth in After Effects.
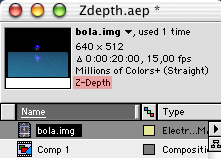
Once we generated our images, we can import them into AE. In the project window, we can clearly read the image info, mentioning "Z-Depth", which means that we have succesfully built a sequence img + eiz.
Once we create a new composition and we apply our sequence, we can start using the z-depth data right away.
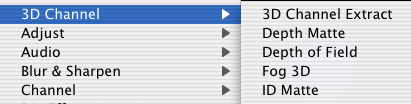
In the Effects menu, the 3D Channel sub-menu offers 5 possibilities.
3D Channel Extract- it allows us to extract the ZDepth information of the sequence, a series of grayscale images ready to be applied to any operation using 3D channels.
Depth Matte- it suppresses pixels that are outside the zone which smoothens the transition of this cut.
Depth of Field-Simulates the depth of field in a photographic camera, where objects at different distances cannot be focused at the same time. This is the most common use of Zdepth in digital composition.
Fog 3D - it simulates distance fog, determined by the camera.
ID Matte- Allows us to select certain objects to be isolated. Works only with RLA files.
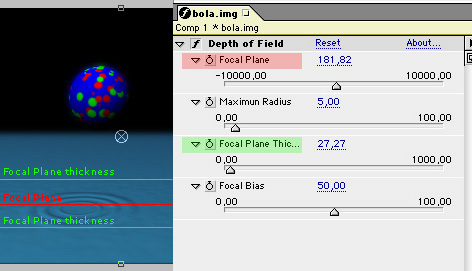
Depth of Field in After Effects
Once we applied the Depth of Field filter to our image, we have to follow these steps:
1. Tweaking the Maximum Radius will determine the maximum blur in our scene
2. Increasing the Focal Plane Thickness will enlarge the image area that appears focussed
3. To publish the Focal Plane, to calculate the zone of our image where we want that approach.
4. Once we have our zone of approach well defined, we can publish the Thickness and the Maximum Radius to obtain the best results.
5. Remember to change the Layer Quality settings to "best", in order to get a nicely smoothened defocussing, otherwise leaving us too much mosaic.
3D Channel Extract- it allows us to extract the ZDepth information of the sequence, a series of grayscale images ready to be applied to any operation using 3D channels.
Depth Matte- it suppresses pixels that are outside the zone which smoothens the transition of this cut.
Depth of Field-Simulates the depth of field in a photographic camera, where objects at different distances cannot be focused at the same time. This is the most common use of Zdepth in digital composition.
Fog 3D - it simulates distance fog, determined by the camera.
ID Matte- Allows us to select certain objects to be isolated. Works only with RLA files.
Depth of Field in After Effects
Once we applied the Depth of Field filter to our image, we have to follow these steps:
1. Tweaking the Maximum Radius will determine the maximum blur in our scene
2. Increasing the Focal Plane Thickness will enlarge the image area that appears focussed
3. To publish the Focal Plane, to calculate the zone of our image where we want that approach.
4. Once we have our zone of approach well defined, we can publish the Thickness and the Maximum Radius to obtain the best results.
5. Remember to change the Layer Quality settings to "best", in order to get a nicely smoothened defocussing, otherwise leaving us too much mosaic.
 |
<<< See the result Quicktime movie (660k) (Needs Quicktime 6.0) |
http://www.triade.es
 |