|
|
|||||||
|
David Della Rocca website English version by Bert Vrusch website |
|
Size:
63 ko
Platform: Mac/PC |
|
infos: |
| Animating a vehicle - Part 1 |
Please also note that this approach remains relatively basic and limited. If you really desire to explore this subject in a more profound way, I suggest you take a look at tools like XPressionist or Reelmotion.
Step 1 - Animating the car I started by importing my car in Animator while taking care of the correct alignment along the Z-axis, and placing it on floor level in my modeler. Instead of animating the car itself, we will be animating a null object on which we'll attach all the different car parts. - Create a null object from the top view window and place it in the centre of the rear axle. - Rename it into "Car Mover" - Group underneath all possible car body pieces (in this tutorial we only have one piece, named "car") Leave the tyres aside for the time being. - Make the null object "Car Mover" animatable in the Project window. - Move the timeslider to 2 seconds and translate the car a couple of meters ahead in a straight line. |
 |
|
 |
- Move the timeslider to 4 seconds and (from the top view) push the car a bit to the left side. Adjust the path vectors accordingly to create a nice curved path (image 02). Be sure not to create a curve that's too narrow, because a car is always limited by it's turning radius. |
|
The Auto Bank constraint We will now apply an "Auto Bank" constraint in order to make the car rotate automatically when following the curve. - Go back to 0.0 seconds at the start of the animation - Select "Car Mover" in the Project window - Go the the menu "Constraint" and choose "Auto Bank" A first message will appear, warning you that you can't animate the object anymore as soon as the constraint has been applied. Click on OK. Then a red window will pop-up, indicating that you're supposed to select the object that needs to be constrained. - Since the Auto Bank will be used on the object itself, click on "Car Mover" - Hit Esc to finish the operation. |
 |
|
Let's tweak the settings - Select "Car Mover" in the Project window - Go to the Constraint menu and choose "Constraint Editor" In this window you can see the type of constraint applied, Auto Bank, and also the target object "Car Mover". - Click on "Car Mover" in the list and change the "Weight" parameter to 0.0 Now we will limit the rotation angle to make sure that our car doesn't tilt any further than it's shock absorbers do allow. To achieve this the parameter "Max Roll" will enable you to limit the curving (in degrees). You also have a gravity setting that permits us to define the weight of the vehicle, resulting in more or less tilting while making the curve. Here you will see some examples.  Step 2 - Animating the right direction |
||
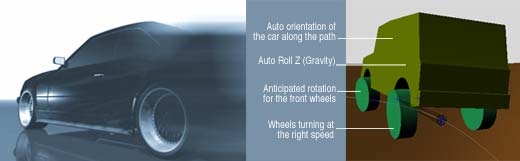
| Without any doubt this will be the most complicated part of this tutorial, where we are going to have the car behave in a realistic way. - First we have to create 2 null objects located where we normally have our two front wheels. - Rename them "wheel pivot L" and "wheel pivot R". Next, attach the left wheel to "wheel pivot L" and the right wheel to "wheel pivot R". Orientation bone - From the topview window, create a Bone that starts from "Car Mover" up to the middle of the two front wheels. (Animator will automatically place a null object at the end of that bone, called Joint End) - Select the bone, go into the menu "Constraint" and choose "Position" - Choose the null object "Car Mover" as a target - As a result, our bone will now follow the car's translation, but not yet it's orientation. |
 |
|
- Select both the Bone and the null object, go the the "Character" menu and choose "Add IK Handle" (While the bone and the null object are forming a kind of chain, the IK handle will work as a grip, enabling us to control the chain's rotation). - Make that IK Handle a child of Car Mover, with the car's body. - Group the the two rear wheels as children of the Bone - Also, attach "wheel pivot L" and "wheel pivot R" as children to the Bone (Underneath these null objects, the two front wheels already have been attached) Normally spoken, you should have two main groups now (see image shown below) where the parents are "Car Mover" for the first group, and "Bone 1" for the second group. Some clarifications : If we simply had attached all wheels to "Car Mover" , they would have lifted from the floor level when tilting the car. Therefor, we had to find a trick to make sure they followed the car's movement (Car Mover) without being attached as children underneath the car. - Our solution is the position constraint that forces the Bone to follow the car. Another problem : how will the wheels be following the car's orientation, without being grouped underneath ? I could have simply applied a rotation constraint, but that one would have conflicted with the one that controls the direction. - Our solution is using the Bone with an IK Handle that serves as the car's auto orientation. |
 |
| Important : It's wise to complete your car's animation path right now, together with all accelerations and curves. Why ? This is because we will duplicate "Car Mover" and we want it to be perfectly aligned to it's original. That's why I advise you to finalize your car animation (Car Mover) first. |
When you have finished your vehicle's animation path :
- Go back to 0.0 in the Project window
Duplicate "Car Mover" and kill all it's children (yes, 3D can be very cruel)
- Rename it as "wheels direction"
This null object will now be following the same trajectory as "Car Mover"
- For "wheels direction", open it's "Constraint Editor"
- Erase the existing constraint (that's "Car Mover" in the list)
| Auto Bank - Go into the menu "Constraint" , choose "Auto Bank" and apply it to itself. In the "Constraint Editor" window, you should now see "wheels direction" listed instead of "Car Mover". - Change the "Weight" value into 0.0 |
 |
Rotation constraint on the wheels
Now we will force the wheels to follow the rotation of "wheel direction".
- To do this, go back to 0.0 in the Project window
- Detach both null objects "wheel pivot L" and "wheel pivot R" from it's parent, while leaving all wheels grouped underneath.
- Select "wheel pivot L" and apply a rotation constraint to it, having the null object "wheel direction" as a target. Do the same for "wheel pivot R".
Now you can attach both "wheel pivot L" and "wheel pivot R" back to Bone 1.
- Select "wheel pivot L" and open the Constraint Editor window.
Deselect the boxes rotation X and Z, to make sure our wheels only pivot upon the Y axis.
Do the same thing for "wheel pivot R".
Last and important thing to tweak :
- Open the Constraint Editor window of "wheels direction"
- Uncheck Enable Auto Roll and set the "Anticipate" value to 0.7
Thanks to this Anticipate value, the wheels will be turning before the vehicle does, simulating perfectly the car's slowness due to it's weight.
Step 3 - Animating the wheels This last step is relatively easy to achieve compared to the other ones, but here we're dealing with a severe limitation. This limitation being the fact that we don't have any tool in Animator, that allows us to autoroll our wheels depending on the car's speed. The only tools that accomplish that nowadays are XPressionist or ReelMotion. For the time being, here's a simple formula that you can use to let your wheels roll on a circuit - without breaking or accelerating : |
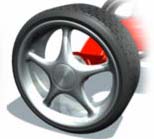 |
Let's say this is 60 for example...
Multiply the diameter by 3.14. This will unveil your wheel's circumference, thus the car's travelling distance for one complete wheel rotation.
60 x 3.14 = 188.4
In case your car travels a 1000 units, do this :
1000 divided by 188.4 = 5.3
So you will have to make exactly 5.3 cycles per wheel to achieve a realistic animation ... this means :
5.3 x 360 = 1908 degrees rotation
That's it, this finalizes both the car's and it's wheels' animation.
| To change the car's animation, meaning the translation of "Car Mover" : - Erase the existing keyframes of "car Mover" - Record your new trajectory again - In Keyframe mode, copy the position values X and Z and paste them into the X and Z values of "wheel direction", to make sure he follows "Car Mover" again. You'll see, this action takes only 10 seconds. Why using all these null objects? The advantage of these null objects is, that you can easily replace all these car pieces by your own models. Taking into account that you'll keep the same scaling, there won't be much to change except for the wheelbase and the car body's height. Importing your own models : - If possible, import your vehicle model at the Z axis direction - Make sure you tweak it's scale - Position the car at ground level while you're still in your Modeler (rather than doing this in Animator) - Additionally, I advise you sincerely to start with a low-polygon model having the same measurements as your final vehicle. This will save you a lot of time. |
All right, be a careful driver and take good care of my car :-)
David
 |
|
|