|
|
|||||||
| Animating a telescopic movement |
|
This tutorial will explain to you how to animate a telescopic object using the position constraint. To help you better understand I strongly recommend you to download the Universe project file below. Open it and take a look at it before reading this tutorial. For this example I rapidly modelled a little 'walkie-talkie' with an antenna. Afterwards I duplicated it and applied the constraints only to the second one, allowing you to test this tutorial to the first model.
Tweaking the 'Weight' - Select the first part (tel1) and open the window 'Constraint Editor'. In the target list we find our two Null Objects. - Click on the first one, 'moving target' and change it's weight to 0.2 - Then click on 'static target' and change it's weight to 0.8 As a result, the object 'tel1' now will be attracted more to 'moving target' than to 'static target', all of this in a 80-20% comparison, hence the values 0.2 and 0.8. - On the next model, tel2, we will be assigning the values 0.4 and 0.6 - On model tel3, 0.6 and 0.4 - On model tel4 0.8 and 0.2 - And on model tel5 1.0 and 0.0 This implies that tel5 will be perfectly take over the position of 'moving target' and not at all 'static target' All of this is just a matter of multiplication factor Knowing that at 1.0 the attraction will be complete, and at 0.0 it will be zero, we just have to divide 1.0 by the number of parts that build up the antenna. In this example we have 5 parts, which leaves us with 0.2 for each part.  Limiting the movement : To finish it off , all that remains to be done is defining the movement limits for 'moving target', the Null Object that is going to control our animation. - Select 'moving target' and open the window 'Joint editor' - In 'Link type' choose 'Custom' - Click all boxes except the one called ' position Y' so it will be moving only along that axis. - In the preview window, slide open the antenna to the max - Select 'moving target' and open the window 'Joint Editor' - Click the box called 'Limits' and then click the box 'Position' - For 'Maximum Y' click on the blue triangle (Use current value) - Slide down the antenna to the minimum position - For 'Minimum Y' click on the small blue triangle (Use current value) 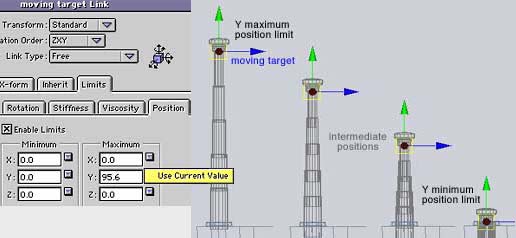 Right now 'moving target' can only move along the Y-axis, being between the position limits of 0.0 and 95.6. To animate the antenna, you just have to reposition 'moving target' in order to slide it in and out. Concluding, this works actually quite nice! Feel free and apply this technique to any of your projects using any telescopic variant you've been building. Take care my Friendz :-) David Della Rocca |
 |