|
|
|||||||
| How to make hydraulics move |
|
In this tutorial we explain how objects can be constrainted to object targets, at which to aim.
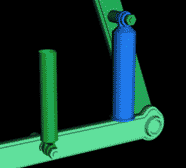
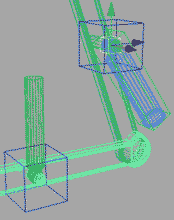
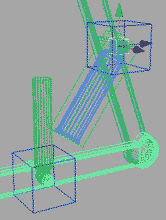
In this example: Lets take a hydraulic arm. The hydraulic tubes (named tube and piston) are modeled in a straight way, as it is seen in the picture. Now, what we want is when the upper arm moves the tube and piston models have to move along with it, but it has to be in the right direction: towards each other. |
||
|
To make this happen there are a few things to consider:
- we have to fix the rotation point of both tube and piston - the upper tube (piston) has to move along with the upper arm. - the tube and piston have to point to each other the whole time. 1) Link editor window: First we have to fix the rotation point for both the tube and piston. 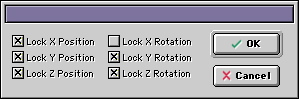 |
 |
|
| - Select the tube and open the Link Editor. - Choose under the X-form Tab next to Link Alignment Position "Bottom". - Zoom in, and be sure to move the linkpoint to the center of the circel of the tube. That will be the rotation point for the lower tube. Do exactly the same with the piston model. Now we have to be sure that the tubes only will rotate on the X axis. - So choose next to Link Type "custom" and check in the window all checkboxes boxes except for the "Lock X Rotation". Do the same for the piston. |
 |
|
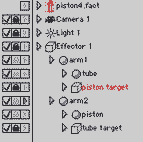
| 2) The next step is to connect the tube and the piston to the right arm. The tube has te be connected with the lower arm, so make the tube a child of the lower arm. Then make the piston a child of the upper arm. To make thing easier we add a null (effector) and child he two main groups to it.The whole setup is ready. Now we only need to configure the direction of the objects, when the upper arm is rotating. 3) Now add two target nulls to the project. One will be the target for the piston, the other for the tube. The nulls have to be at the position as the rotation point of the tube for one, and the piston for the other one. See the blue boxes in the pictures below.The boxes (nulls) will be the target so, child them to the corresponding groups. The hierarchy should look like this: |
 |
|
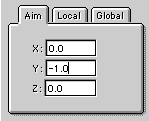
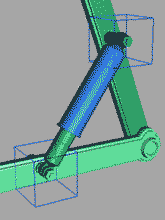
| 4) Applying Aim constraint: Now we will constraint the piston to the lower target. Select the tube and choose Aim from the Contraint menu. Select the lower target null. As you will see, the tube will rotate, but in the wrong direction. This is because rotating will always be counterclockwise. So, to fix this, select the piston and open de Constraint Editor.Under the Aim Tab you will find X, Y and Z values. The Y value is 1. Enter the value -1 and see what happens.Then select the lower tube, choose Aim under Constraint menu and select the upper target (null). Now the tubes should point at each other. Finished! Rotate the upper arm to see if the tube and piston move along and rotate correctly. If so, your setup has succeeded. Good luck. |
 |
|
   |
||
 |