|
|
|||||||
| Creating heat effects in Universe |
 Here's some help for you folks who want to create that famous 'heat' effect (as known from dessert images where the hot air deforms the horizon) All of this will be done without even touching a video compositing tool. Here's some help for you folks who want to create that famous 'heat' effect (as known from dessert images where the hot air deforms the horizon) All of this will be done without even touching a video compositing tool.Download the file 'Mirage_hotel.prj' and open it. This will help you to better understand the following steps and - if you can spare a couple of minutes - let's you render a 40 minute animation. |
||
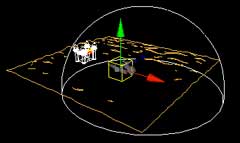
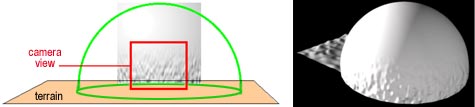
| How does it work? In order to obtain a deformation effect that covers the entire back part of the scene, I have placed a half sphere surrounding our camera. This object will make sure that we'll get our deformed lens effect, a bit like observing the landscape through a glass or a bottle. Take a look at the image that we're showing here, displaying all the different objects in the scene. You'll see our terrain shape on which the building is placed together with the camera and our half sphere that surrounds it. |
 |
|
|
Why a half sphere? The half sphere that we used could have been easily replaced by a cylinder or even a flat plane. The resulting effect would have been the same. The advantage of using a half sphere is that it will give us more freedom in using different camera movements. That's all. Let's peel the sphere's material now To realize this particular effect, we have to make sure that the object that serves as a contact lens, is completely transparent. It's important that we get rid of any kind of reflection (specular), making it invisible in the render. Let's start with the transparency. In the half sphere's material window, move the transparency slider down to 0, to render it completely transparent. |
||
| To obtain the deformation effect, we will use refraction. This parameter simulates the deformation of light (and our image) by applying a material. To make sure that this parameter will work, you have to check the 'Use Raytrace' box and enter a value bigger than 1.00. Be careful because this slider is very sensitive! A value between 1.03 and 1.05 will give you best results ... but you can always experiment a bit and try higher values ... Psychotic effects are guaranteed! |
||
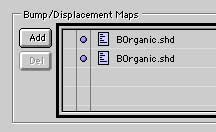
| The specular In order to make our half sphere totally invisible, it's important not to get any refelction on it. That's way I moved the "specular" slider value to 0. The bump, an important aspect. Oh yes, we sure made up our minds... By applying a bump texture to our half sphere, we will create a nice and bumpy surface that we won't see , because it's invisible. However, due to it's refraction it will generate a nice deformation on the back part of our scene. For this I've used twice the BOrganic shader from Konkeptoine and animated the both of them slightly different, to create more complex deformations. |
 |
|
| Let's take a look at the shader settings in detail Density controls the shader's global scale. You will have to adjust this parameter to your objects' size (here we'll use our half sphere) Bump controls the bump height. Try to render an image - while having unchecked the transparency boxes in the render information window (Command-R) - to verify if the bump shows up high enough. Once we have these two settings adjusted, we will tweak the shader so that the bump will soften out along the Y-axis, giving us that famous heat effect that starts at ground level, and fades away up high. Bump fade option: we'll choose Fade Y - to fade out the effect along the Y-axis, following our half sphere's height. |
||
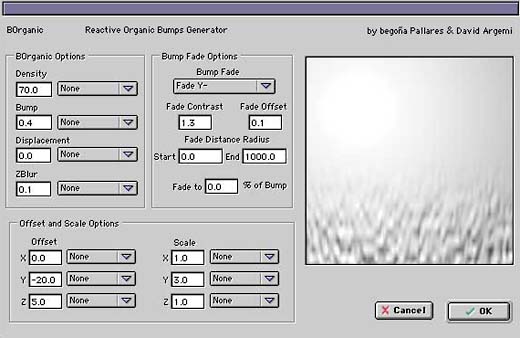 |
||
| Fade contrast will enable us to control the extension of the fade gradient. Fade offset : Use this value to translate the fading effect up or down the axis. These two values determine where our heat effect starts to become visible - starting at ground level or higher - and at what height the effect starts to disappear. We recommend that you make some test renders here as well (always without transparency) to get a grip on the altitude of the effect in your scene and fitting it in your camera view. | ||
 |
||
| The Y Scale will allow us to tweak the shader's aspect by deforming it's height. Here we use a value of 3.0 that represents a 300% scaling. That's it for the look, let's animate our effect now! - Set the animation's frames per second rate - In the project window, check the green triangle box next to our sphere object to activate the recording - Adjust the object's blue animation bar to the desired effect length of your choice. Slide it to the end of the animation, if you wish to see the effect constantly. |
||
| Open the BOrganic interface again: Offset Y: To make sure that the bump will animate up high, we should use a negative value setting for the Y-axis offset. For this file I used -20 during 6 seconds, but of course that depends on the scale of your Universe project. Therefor, I think you should do a couple of tests to tweak the speed. Offset Z (or X): Deplacement along the Z axis (or X axis, according to your orientation) will create a sort of distortion in the bump, giving the impression of a moving - more organic - fluid |
 |
|
To finish it off, I simply duplicated the BOrganic shader (select it, then copy / paste) and slightly changed several settings of one of them. For instance the translation speed (offset) and the shader's global scale (density). Putting one shader on top of the other, will also make the deformation effect more complex and give us a sense of depth. Here's where I finish my explanations, all you need to do is testing it at route 66 or in a beatiful dry desert, that will be a great effect ! |
||
| Here's a summary for the core people 1) Move the transparency slider down to 0 2) Adjust the refraction indicator between 1.03 and 1.05 3) Set the specular amount to 0 4) Put the BOrganic shader in your objects' bump/displacement channel 5) For shader settings, use 'Fade Y' to fade the bump 6) Animate the Y-offset in order to make the bump go up 7) Animate the Z or X offset to create a bump distortion 8) Launch a render and go for a beer, or drink some coffee at my health :-)) When you return it will be tremendously hot !!! What if Britney Spears would go and promenade between these dunes ? But then again, one should not be to demanding when it comes to special effects :-) |
||
Help! 'I don't own the BOrganic shader and don't have the bucks to buy it' The animated bump can also be realized as an after effect. Animate the 'Fractal Noise' plugin while using a black gradient that covers the top part of the image. Use this movie in the bump channel instead of BOrganic. This takes much longer, works less efficient and will force you to generate a # Mb movie on your harddisk. Decide for yourself... And using 100% compositing? The effect is also feasable with compositing tools like After Effects or Commotion. In some cases this technique might turn out to be more practical or faster. The principle is quite simple. Start isolating a part of the image by using a mask. Then apply a deformation to this zone with a nice filter. (The 'Mirage' filter from Puffin Image Lounge is excellent to create this effect) It starts getting complicated when you have camera movements or when using actors or objects near the camera.... That's exactly the moment where the 100 percent 3D solution becomes interesting. Especially since it will be a single pass render. It's up to you to decide which technique suits the best... David.D |
||
 |